Create or update records in bulk with XML Import
You can create or update many records in bulk with the XML Import tool.
On this page
Before you begin
You might want to watch our XML Import video tutorials on YouTube and read our Explainer article on our blog.
Here are a few notes about how XML Import works.
How many files can you update?
-
You can only import data into one file at a time. For example, the Object file.
Are they new or existing records?
-
If you're importing data into existing records, you must include the System ID or accession number.
-
If you're creating new Object records with accession numbers, you must first ensure the accession number format exists in Vernon CMS.
-
If you are creating new Person records, you must include the Record Type field and Person/Corporate Type field.
What type of fields are you importing data into?
-
For some tables of data, such as the Valuation table, you must import data into multiple fields.
-
You can't update the Current Location and Location History fields with XML Import. Instead, use the Bulk Move tool or Batch Location Change tool to update or assign locations to your records after the XML Import. See Move objects and packing units in bulk and Move or inventory objects to many locations in bulk.
-
If you have more than one entry mapped to one authority field, you must enter each piece of data into a separate cell of your spreadsheet, and map it to the same field in Vernon CMS. For example, if you are importing more than one Primary Maker, their names must be in separate columns of your spreadsheet.
-
You can append data in tables with XML Import, including multi-value fields, but you can't replace it. You can only replace data in single-value fields.
-
To tick a checkbox field as part of an import, use Y (for Yes).
Part 1: Prepare your data for import
You’ll start off in Microsoft Excel. You’ll enter your data, then generate an XML file.
-
In File Explorer, go to the Wincoll > Toolkit folder and make a copy of the XMLImport.xlsm spreadsheet.
-
Paste the file in a folder you can easily access, and rename it to reflect the data you will import. For example, valuations.xlsm.
-
Open the spreadsheet.
-
Go to the Data tab. In the first row, enter headings that represent the fields you want to import data into.
-
The headings must be lower case.
-
Use underscores instead of spaces.
-
For example, enter id for the System ID, and risk_factor for the Risk Type field.
-
-
Enter the data into the columns below each heading.
-
Each row represents one record.
-
Don't leave any gaps in the rows.
-
-
Go to the Control tab. In the Destination field, enter a file path and file name ending in ".xml". For example, C:\temp\valuations.xml.
-
Click Generate. An XML file will be saved to that destination.
Here’s an example of an XML Import spreadsheet:
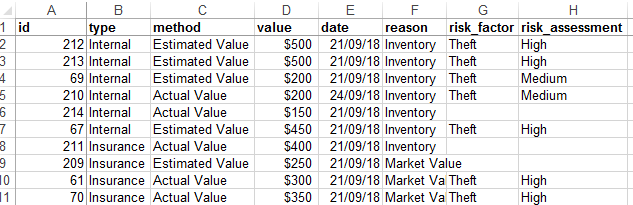
Warning: Don't name the headings record or recordset. These terms are used in the XML Import Configuration window by another process and will confuse Vernon.
Part 2: Set up the XML Import configuration
You’ve created the XML file. Before you can import it, you need to set up the configuration in Vernon CMS.
There are three steps to setting up an XML Import configuration:
-
Set the parameters.
-
Set the field mapping.
-
Set the record matching.
Note: If you are importing data in MARC format, you can copy the master MARC configuration record. For more information, see MARC import.
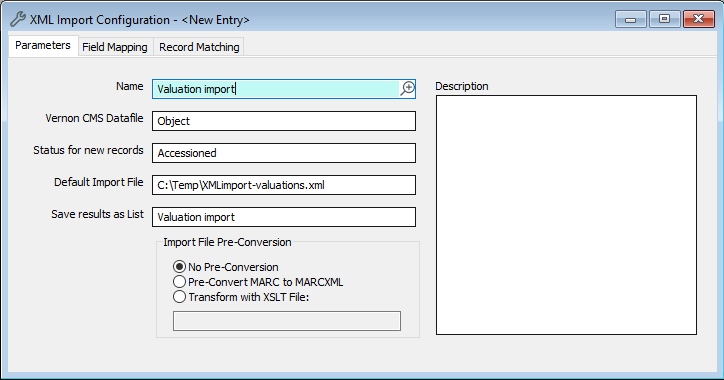
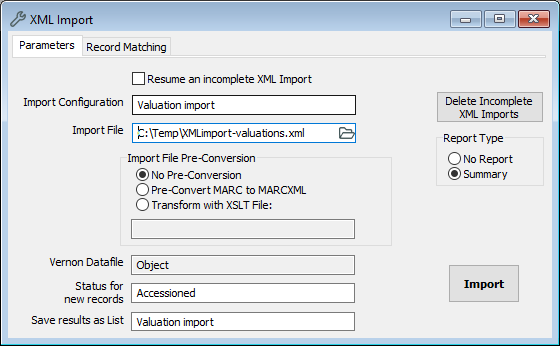
Step 1: Set the parameters
-
Go to Tools > XML > XML Import > Configuration.
-
In the Name field, enter a name for the XML Configuration. For example, Valuation Import.
-
In the Vernon Datafile field, enter the name of the file you'll be importing data into. For example, Object.
-
In the Status for new records field, select a status. For example, Accessioned. You'll need to do this even if you aren't creating new records.
-
In the Default Import File field, enter the file path and file name of the XML file. For example, C:\temp\valuations.xml.
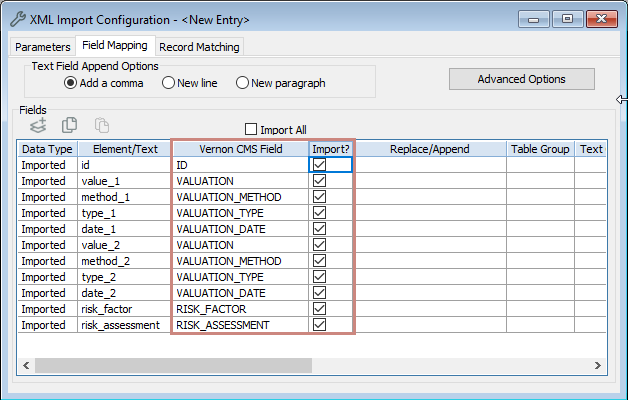
Step 2: Set the field mapping
-
In the Field Mapping tab, under Fields, click the Get element headings from XML file button.

-
The headings from your spreadsheet will be imported into the Element/Text column of the table.
-
The Data Type column will automatically be set to Import.
-
-
In the Vernon CMS Field column, enter the fields you want the data to go into.
-
In the Import? column, select the checkbox.
-
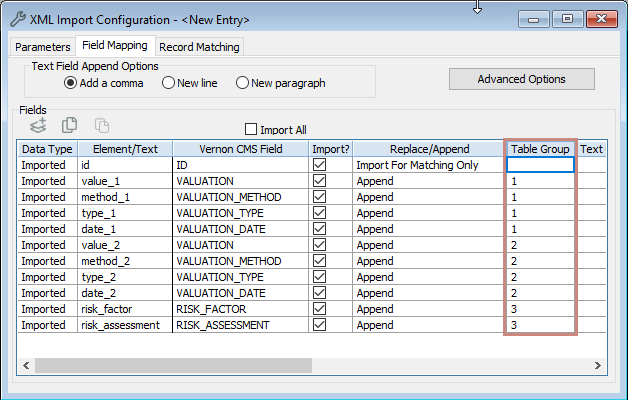
In the Replace/Append column, select whether the imported data should replace any existing data in the field, or be appended to it.
-
If you're importing data to existing records, then for the ID field (or Accession Number field), select Import for Matching Only.
-
If you're creating new records and are including the Accession Number field, select Replace.
-
-
If you are importing data into a table, use the Table Group column. Enter matching numbers for all the fields that belong to the same row of a table. For example, all the fields in one row of the Valuation table could have "1", and all the fields in one row of the Risk Assessment table could have "2".
-
Optional: To enter text that is to be the same for all records, add a row:
-
In the Data Type field, select Static Text.
-
In the Element/Text field, enter the text. See Element/Text field for more information.
-
-
Optional: Enter data in the following fields as required:
Note: For certain types of data, including ISBN numbers and data in MARC format, you can use enter a validation routine in the Validation column. For more information, see XML import validation routines.
Step 3: Set the record matching
In the Record Matching tab, select one of the following options: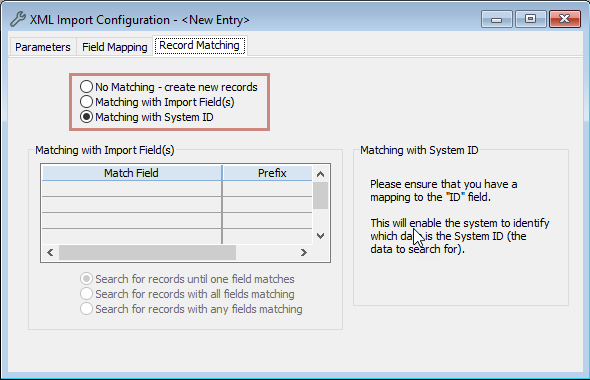
-
If you're creating new records, select No Matching - create new records.
-
If you're matching with the Accession Number, select Matching with Import Field(s).
-
In the table, in the Match Field column, select Accession Number.
-
In the Index column, select Accession Number Index | ACCESSION_NO_INDEX.
-
-
If you're matching with the System ID, select Matching with System ID.
Now, click Save in the toolbar to save your XML configuration.
Part 3: Import your data
You can now import your data.
-
Go to Tools > XML > XML Import > Import.
-
In the Import Configuration field, enter the name of your XML import configuration.
-
Optional: In the Save results as List field, enter a list name.
-
Click Import.
-
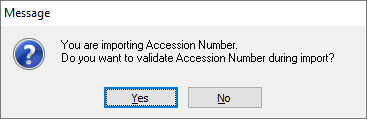
If you're importing data into the Accession Number field, Vernon will ask if you want to validate the accession number against the formats that have been defined in your system. We recommend that you select Yes and validate the accession numbers. If you select No, the system won't check for duplicate accession numbers, and if the incoming accession number doesn't conform to any of your formats, it will be entered on the record without a format.
-
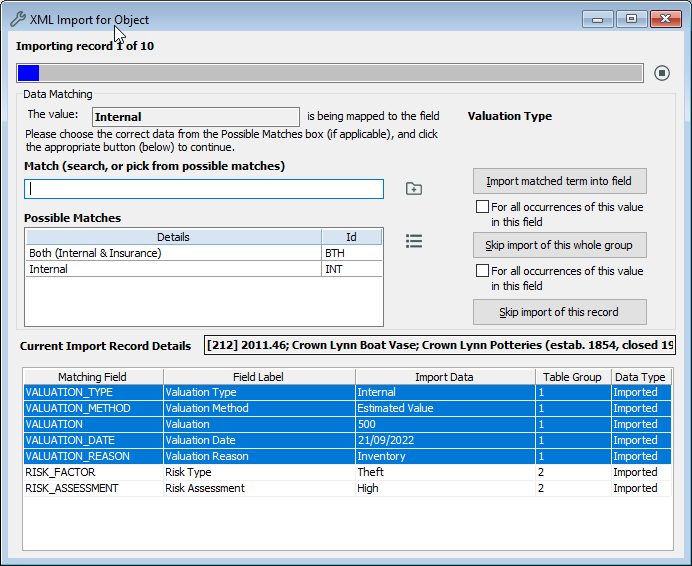
The XML Import Matching window will open and the system will start importing data.
-
The XML Import Matching window matches data and records from your XML file to Vernon CMS.
-
The window also displays progress information.
-
You can also use the Stop button to stop the import at any point. In this case all records prior to the stop will be imported, but the current record and all records after it in the XML file will not be imported. Your Import will be saved should you wish to resume it at a later time.
-
-
If more than one authority term match is found, the import will pause and the terms will display in the Possible Matches table. If the term doesn't exist (for example, it is a new term or it is misspelled), the import will pause. You have several options:
-
If multiple terms are displayed in the Possible Matches table, select a term and click Import matched term into field. To see your possible matches in more detail, click List. You can optionally tick For all occurrences of this value in this field. All further matches the system makes between the selected match term/value in the mapped field will automatically proceed.
-
If the right term isn't displayed, then in the Match field, search for a term or click Options. Then click Import matched term into field.
-
You can click Create a new term. This will take you to the appropriate authority file where you can create the term you want, save it and close the window. This will then import that newly created term to the field.
-
You can click Skip import of this value. If the data is being imported into a table row that has mandatory fields, this button is Skip import of this whole group. You can optionally tick For all occurrences of this value in this field.
-
You can click Skip import of this record.
-
When the import is finished, a report will appear to show how many records were processed and if there were any errors.
Video: XML Import Webinar