Export Photo/Audio-Visual records to a folder
Learn how to export your image and media files so they can be used by a program in a different location or shared with people.
Overview
When you include a Photo/Audio-Visual field in an Export report or XML Export report, the report will include the file paths of your images or media, not the actual files. If the program using the export file is on a different network than your image or media files, it won't be able to access them. Instead, you can export image and media files to a folder, which can then be transferred to the required location.
You can also export Photo/Audio-Visual records to a folder so that you can share them with other people, such as researchers, or just for your own reference and use, such as using an image in a blog post.
Video
In this video, you'll learn how to use the Reporting tool to export images to a folder. For an introduction to the Reporting tool, see the Reporting video.
Steps
-
Find the records you would like to report on.
-
Click Report on the toolbar.
-
Click Create New Template.
-
Under Report Type, select Export or XML Export.
-
Click Formatting Options.
-
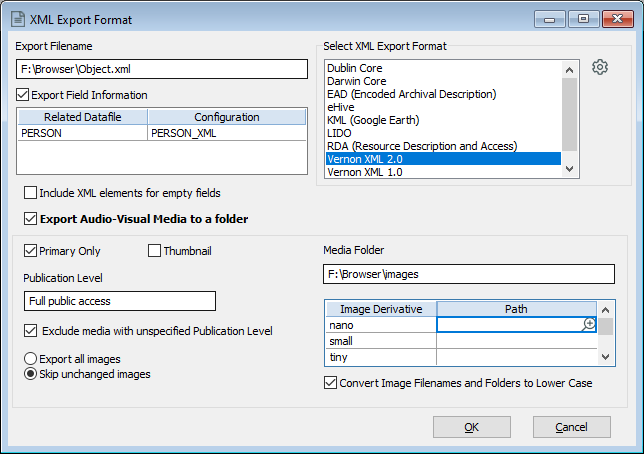
In the Export Filename field, choose a location to save the export file to, and enter a name for the file.
-
Under Export Format, select an option.
-
Select Export Audio-Visual Media to a folder.
-
Choose the relevant options for how images are exported:
-
To export only the first image in a record, select Primary Only.
-
To export thumbnail images only, select Thumbnail.
-
In Publication Level, select your public access level (for example, Full public access).
-
To exclude images with no publication status specified, select Exclude media with unspecified Publication Level.
-
Select Export all images or select Skip unchanged images if you have previously run this export, and are exporting media to the same folder again. The system will check if an image has changed since the report was last run. If it has changed, or if there is no image in the folder at all, Vernon CMS will generate a new image.
-
In the Media Folder field, choose where the exported images will be saved .
-
In Image Derivative, select the image derivative sizes to export. They will be created in sub-folders of the same name in the Media Folder.
-
You can override image derivative folder names in the Path field.
-
If you would like all of the images and folder names to be lower case, select Convert Image Filenames and folders to Lower Case.
-
-
Click OK.
-
Click Run Report and then click Export.