Export data in XML format for public access
Learn how to export data from Vernon CMS in XML format for use in other applications like Vernon Browser.
Overview
-
You'll need to create a saved XML Export report for each of the files to be published to Vernon Browser. For example, you'll need to create a report for the Object file and a report for the Person file.
-
Make sure you create the Object report last. That's because it will reference the saved reports for the related records to publish. For example, if you are publishing Person records for the Primary Maker field, you’ll need to link the Object record to an existing Person XML Export report, so that Vernon CMS knows what information to publish about the related people.
-
Export all of the files to the same export folder. For example:
-
F:\browser\object.xml
-
F:\browser\person.xml
-
-
You don’t have to publish images for all files. For example, Venue records might never publish images even if the records have images linked in Vernon.
Selecting fields
-
You must include the flag field in the Object file report to indicate which records are ready to publish. This is usually the Published Collection field.
-
The Image Ref - Relative Path field must be included if images are exported for the file.
-
Vernon Browser's tag navigation and search facets work better with short elements of data. We can help you set up symbolic (calculated) fields. These can display just the person name (not life years or nationality), and can separate individual levels of a hierarchy (for example, Subject Category, Classification) into individual terms.
-
If you want to sort Objects by a Person field, you'll need a symbolic field to additionally export the names in last name, first name format.
-
If you're exporting fields that link to another file that is being exported, then you need to set these fields to export the related record. For example, in the Object file you may export the Primary Maker field or the Related Exhibition Venue field. You need to set the Primary Maker field to export the Person record, and the Related Exhibition Venue field to export the Exhibition Venue record. For more information, see Export related file data in XML format.
Steps
-
Open the records you would like to export.
-
Click Report on the toolbar to open the Reporting tool.
-
Click Create New Template.
-
Under Report Type, select XML Export.
-
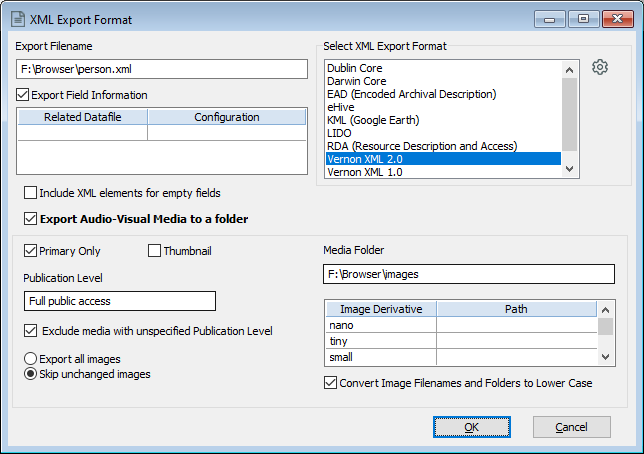
Click Formatting Options to open the XML Export Format window and select your options:
-
In the Export Filename field, select your export folder and name your file (for example, person.xml).
-
Under Select XML Export Format, select Vernon XML 2.0.
-
Select Export Audio-Visual Media to a folder.
-
Under Publication Level, select your public access level (usually this would be Full Public Access). You can optionally select Exclude media with unspecified Publication Level to exclude media where no Publication Level has been set (that is, to treat these media as No Public Access by default).
-
Select Skip unchanged images.
-
Click into the Media Folder field. It will automatically enter your export file path, plus _Media (for example, F:\Browser\person.xml_Media). Change the end of the file path to \images (for example, F:\Browser\images). This will create a media folder called images (all lower case) directly under the same folder as the XML file folder.
-
Under Image Derivative, choose your image sizes. Make sure you use the same image derivative sizes for all files you publish (Object, Person, Venue). The default Vernon Browser templates use these image sizes:
-
nano
-
tiny
-
small
-
medium
-
large
-
xlarge
-
-
Leave Path empty. The image derivative name will be used as the image derivative folder name.
-
Select Convert Image Filenames and Folders to Lower Case.
-
Click OK.
-
-
Click Select Fields, choose the fields you would like to display in your report, and click OK.
-
Optional: Select a display field and click Details to change a field's heading.
-
-
Click Sort Report to choose the sort fields.
-
On the Run Report tab, click Export.