Move an object to a location
Learn how to move objects in Vernon CMS. If you want to give a new object a location, you need to move it.
Steps
-
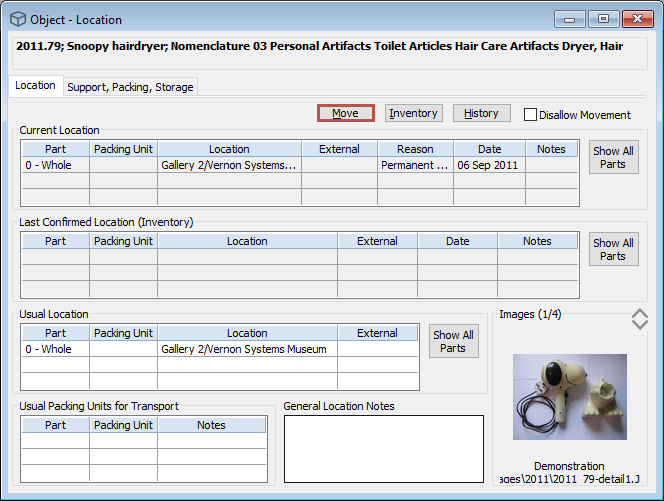
Open the Object > Location window for the object you want to move, then click Move.
-
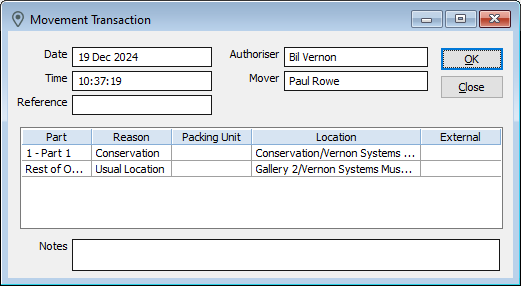
In the Movement Transaction window, enter data in these fields:
-
Date, Time: These will show the current date and time, but you can delete these and backdate a movement.
-
Part:
-
This will default to 0-Whole.
-
If the object has parts, and one or more of the parts is moving to a different location to the others, you can enter the Part ID.
-
If you enter the ID incorrectly, or if there is more than one match, a list of parts will appear allowing you to select a part. You can also click Options to select a part.
-
If this is the first move for an object, you will need a location for every part.
-
You can enter Rest of Object for the remaining parts by entering a forward slash (/) into the field.
-
-
Reason: This will show up in the Current Location table on the Object - Location window. If you select Permanent Exhibit or Usual Location, the Usual Location field will be updated with the location you have entered.
-
Location: This will display in the Current Location table on the Object - Location window.
-
If you entered the reason as Usual Location, the Location field will update with the current usual location.
-
If the object is moving to an external location (for example, an outward loan), enter External Location in the Location field. Then enter the Person or Institution in the External field.
-
-
-
In the Mover field, enter the person who physically moved the object.
-
In the Authoriser field, enter the person who approved the movement.
-
Optional: If you're moving the object into a packing unit, enter the packing unit in the Packing Unit field. The Location and External fields will fill with the details of the packing unit. A packing unit must already exist and be assigned to a location before you can move objects into it.
-
Click OK.
-
Click Save.
Tip: If you're a Supervisor user, you can change whether or not a location mover and authoriser are required when moving an object. To change these settings, go to Tools > System Maintenance > Customised Configuration then go to the Location tab.