Create a user view
Learn how to create a read-only view of a record that will be available in the User Views window.
Overview
A "user view" is a single customised view of certain fields in one place.
When viewing a record, different people need to see different sets of information. The User Views window brings the required fields together so that people can view records with all the relevant information in one place.
For example, when viewing Object records for upcoming exhibitions:
-
The Registrar may most often wish to view the location, size, packing and handling, condition and insurance details of the objects.
-
The Director may be more interested in the acquisition source and method, value and rights details.
-
The Curator may wish to see the provenance, creation and production details, curator comments and restriction details.
You can create a User View for each of these needs so that nobody has to search through multiple windows and tabs for the information they need.
For information on opening user views, and the user views that already exist in Vernon, see User Views window.
Steps
-
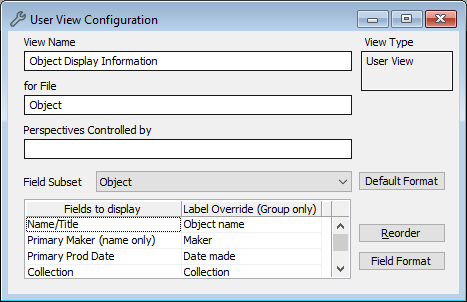
Go to Tools menu > System Maintenance > User Defined Parameters > User View Configuration.
-
In View Name, enter a name.
-
In for File, enter the file. For example, Object.
-
Optional: In Perspectives controlled by, enter the authority field. For information on this step, see Create a user view perspective.
-
In Fields to display, enter the fields you want in the User View, or click Options to select fields.
-
Optional: In Label Override (Group only), give the table a different name. This will change the group labels only, not the individual field names.
-
Optional: Click Reorder to change the order of the selected fields.
-
Optional: Click Default Format to change formatting.
-
To change the font, double-click in Font.
-
To set the default column proportions for the labels, data, and images, under Column Proportions, drag the column dividers.
-
To include images, tick Images.
-
To display the caption, tick Caption.
-
To show only the primary image, tick Primary Only.
-
If you don't need high-quality images in the printed report, tick Thumbnail.
-
-
To change formatting for each group, click Group Format.
-
-
Optional: Click Field Format to change field formatting.
-
Click Save.