Undo changes in a group of records
You can recover an earlier version of records with the Audit tool.
Before you begin
Make sure that all users have closed the windows for the relevant files and records. Otherwise those records will be locked and the system will be unable to recover earlier versions of them.
Records will be restored to the oldest version within the timeframe you specify.
Undo data changes with selection criteria
-
Go to the Tools menu > System Maintenance > Audit > Recovery: Undo.
-
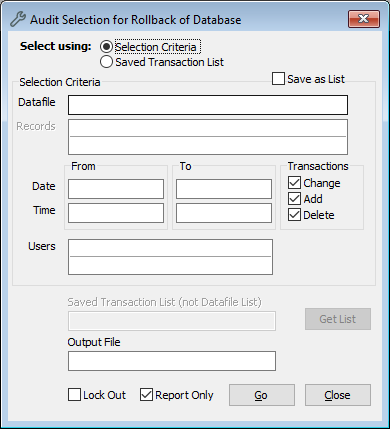
Next to Select using, make sure Selection Criteria is selected.
-
Select your optional criteria:
-
In Datafile, enter the name of the file or click Options to select it. For example, Object. If you leave this field blank, all files will be included.
-
In Records, enter specific records. If you leave this blank, all records will be included.
-
Under From and To, enter the dates and times. If you leave these fields blank, all dates and times will be included.
-
Under Transactions, the options Change, Add, and Delete are selected by default. You can clear these options.
-
Change: A user changes data and saves the record.
-
Add: A user enters data in a blank field and saves the record.
-
Delete: A user deletes data and saves the record.
-
-
In Users, enter the username or click Options to select it. If you leave this field blank, all users will be included.
-
-
Tick the Report Only checkbox and click Go.
-
Read the report and if necessary, edit the details.
-
When you have it set up exactly as you want, untick the Report Only checkbox and click Go.
Undo changes with a saved transaction list
-
Go to the Tools menu > System Maintenance > Audit > Recovery: Undo.
-
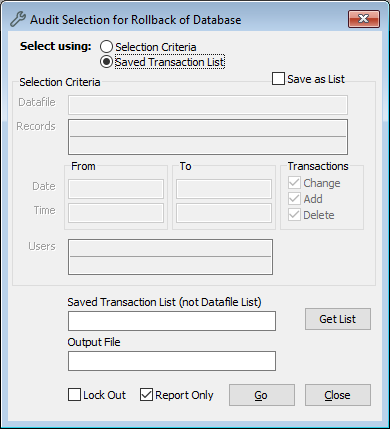
Next to Select using, select Saved Transaction List.
-
Optional: In Output File, select the location on your computer where you want to save a text file of the report.
-
Tick the Report Only checkbox and click Go.
-
Read the report and if necessary, edit the details.
-
When you have it set up exactly as you want, untick the Report Only checkbox and click Go.
Recover data using the Redo mode
The Recovery Redo function will put back anything changed by a Recovery Undo or Audit Rollback or restore data following a hardware failure.
-
Go to Tools menu > System Maintenance > Audit > Recovery – Redo.
-
Enter details about the file, the records, the type(s) of transaction, and the date and time range you wish to recover.
-
Click Go to run the recovery.
-
Records will be restored to the last stored version within the time-frame you specify. That is, if a record was altered a number of times within the specified time-frame, it will be restored to the latest of those versions.
-
The default setting for data recovery is Report Only. When Report Only is checked and you click Go to perform the recovery, a report will appear on screen showing the records that were changed, the nature of the change (whether it was an Addition, a Change or a Deletion) and the date of the version to which the record will be restored.
-
If you are satisfied with the report, you can close the report window, untick the Report Only checkbox and click Go to run the recovery again. This time, the records will be restored as specified (and reported).
-