Create an accession number format
Learn the steps involved in creating an accession number format for your Object records.
Overview
Creating an accession number format can be complex, especially when specifying the segments and patterns. This page describes each of the steps involved and provides specific examples to guide you through the process.
First, you may want to read How accession number formats work. If you need help at any stage, please email support@vernonsystems.com.
Read through this page carefully before creating a format. For each of the steps, we'll look at an example of creating a format for Object records that need Temporary Numbers in the format T2024.1.
Steps
Step 1: Enter the name, description, and type
-
Go to the Tools menu > System Maintenance > Accession Number Tool > Accession Number Format.
-
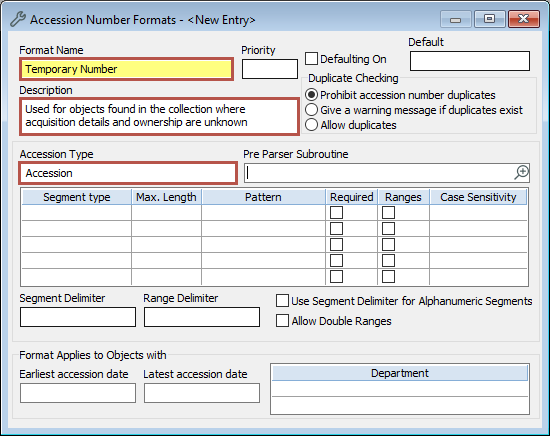
In Format Name, enter a name. For example, Temporary Number.
-
In Description, enter a description. It's a good idea to include examples of valid accession numbers for this format, as it's not always obvious from the Segment Definition table. For example, Used for objects found in the collection where acquisition details and ownership are unknown. Example formats: T2024.1, T2024.2.
-
In Accession Type, specify the kind of records that could be given this number. For example, Accession. Other options may be Loan or Promised Gift.
Step 2: Enter the segment definitions
Next, you'll break down the format into parts (known as segments) and say how many characters and the type of characters each segment can contain. You'll enter this information in the Segment Definition table. Each row of the table represents a different segment.
-
In Segment Type, select an option:
-
Prefix: For numbers that start with a set prefix that is the same for all numbers.
-
Year: For segments that are a year.
-
Sequence: For the first segment that is neither a prefix nor a year.
-
Sub sequence: For segments that follow Sequence.
-
Sub Sub sequence: For segments that follow Sub sequence.
-
Sub Sub Sub sequence: For segments that follow Sub Sub sequence.
-
Alpha: For alphabetic part references.
-
-
The Maximum Length is set by the system and cannot be changed. You can specify your own maximum or minimum number of characters in the Pattern field, but it must be within the range stated in the Maximum Length field.
-
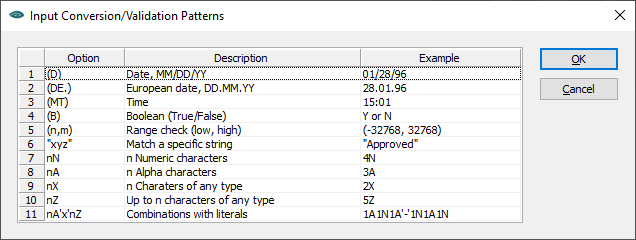
In Pattern, define the characters this segment may contain. Enter the pattern if you know it, or click Options to select a pattern. Pattern elements and examples are listed below these steps.
-
In the Required column, tick the checkbox if this segment must always be entered. Make sure that the required segments come before the optional segments.
-
In the Ranges column, tick the checkbox if you would like to allow ranges for this segment. For example, in the accession number 2023/123/a-d, the last segment may express a range of items (a-d) in the accession 2023/123. If you allow ranges for this format, when you search for 2023/123/a (or 2023/123/b or 2023/123/c or 2023/123/d), you will find the record 2023/123/a-d.
-
In Case Sensitivity, if you would like alpha characters automatically converted to upper or lower case, or not converted at all, select your preferred option:
-
Convert to lower case: All alpha characters within the segment will be converted to lower case for any accession number that is valid for this format.
-
Convert to upper case: All alpha characters within this segment will be converted to upper case for any accession number that is valid for this format.
-
Reject any lower case: Any alpha characters within the segment must be upper case for the accession number to be valid for this format.
-
Reject any upper case: Any alpha characters within the segment must be lower case for the accession number to be valid for this format.
-
-
Repeat steps 1-6 for the remaining segments of your format.
Order of segment types
The default ordering for sorting is:
-
Year
-
Sequence
-
Sub Sequence
-
Sub Sub Sequence
-
Sub Sub Sub Sequence
-
Alpha
-
Sub Alpha
-
Part
-
Prefix
-
Format (accession number format ID)
Warning: These sort settings apply to all number formats, so please contact us for advice before using the segments in a different order.
Common pattern elements
| Pattern element | Explanation of element | Pattern example | Explanation of example |
|---|---|---|---|
|
'Character' |
'Character' can be any character. This is a fixed value (normally used for prefixes). Note that the quote marks are required. |
'L' |
For a loan format that follows the pattern L2015.1.1. |
| nN | A number (n) of numeric characters (N). |
6N |
Six numbers. |
| nA | A number (n) of alpha characters (A). |
2A |
Two letters. |
| nX | A number (n) of any character (X). |
4X |
Four characters. |
| nZ | A number (n) that is the maximum character length (Z) for a segment. | 3Z | A maximum length of three characters. |
| 0 | Any number. |
0A |
Any number of alpha characters. |
| + | A plus symbol means 'and'. It combines multiple elements. |
0N+3Z |
Any number of numbers, up to a maximum of three. |
| ; | A semicolon means 'or'. It indicates possible options for a segment. |
'R';'S';'T' |
Fixed value, can be R, S, or T. |
|
(Number,Number) |
Number can be any number. It indicates a range. |
(1989,1995) |
Any year between 1989 and 1995, including those years. |
Required segments
The Required checkbox defines whether or not a segment is mandatory in this accession number format. Often accession number formats have optional elements, particularly for the finer elements of the format. Make sure that the required segments come before the optional segments.
For example, you may have a format with the structure Year.Sequence.Sub Sequence.Sub Sub sequence.Alpha. If only Year and Sequence are required, you could enter the following range of accession numbers:
-
2023.123.1.1a
-
2023.123.1.1
-
2023.123.1a
-
2023.123.1
-
2023.123a
-
2023.123
Example segment definition
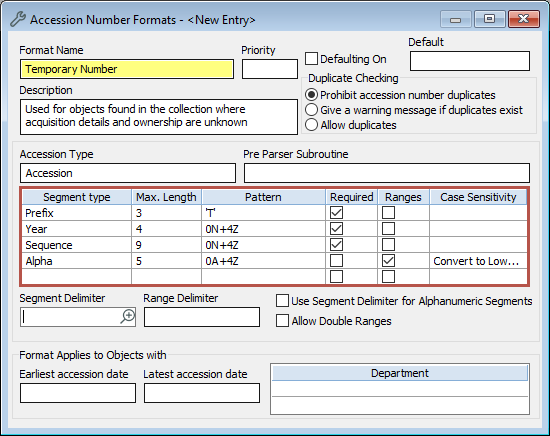
In our Temporary Number example, the following definitions allow these accession numbers, which include a prefix, a year, a sequence, and a range:
-
T2024.12a
-
T2024.12b-d
-
T2024.13
| Segment type | Max. Length | Pattern | Required | Ranges | Case Sensitivity | Meaning |
|---|---|---|---|---|---|---|
| Prefix | 3 | 'T' | Yes | - | - | Start every accession number with the letter T. |
| Year | 4 | 0N+4Z | Yes | - | - | Allow any number (up to four numbers). |
| Sequence | 9 | 0N+4Z | Yes | - | - | Allow any number (up to four numbers). |
| Alpha | 5 | 0A+4Z | - | Yes | Convert to Lowercase | Allow any letter (up to four letters). This segment is optional and allows ranges. |
Step 3: Enter the delimiters
-
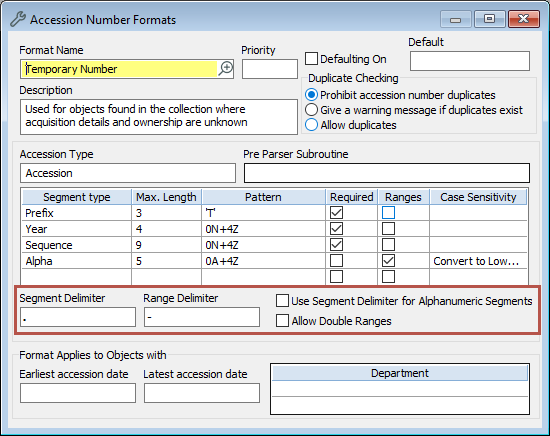
In the Segment Delimiter field, enter the character you would like to appear between segments. For example, a full stop ('.') or slash ('/').
-
If you have ticked the Ranges checkbox for any of the segments, you will also need to enter a character in the Range Delimiter field, such as a hyphen ('-'). We recommend that you use a hyphen as a range delimiter where possible. Note: The segment and range delimiters must be different characters. This makes the format easier to use and allows for much more precise searching on accession numbers.
-
If a segment contains both alpha and numeric characters, tick the Use Segment Delimiter for Alphanumeric Segments checkbox. You can also tick this box if you would like a delimiter to be compulsory between a prefix and the following segment. For example, T.2023.12. For most formats, leave this box unticked.
-
If your format contains two segments in which ranges are allowed, tick the Allow Double Ranges checkbox. For example, the accession number 2023.123-125.a-b includes two ranges (identified by the hyphens). It applies to three items (123-125) that each contain two parts (a-b) and are accessioned as a single entity.
Segment Delimiter field
Here are some examples of segment delimiters in use within accession numbers:
-
2023/12/1, where the '/' signifies a change between the year segment and the sequence, and again between the sequence and the sub-sequence.
-
FA2023.123, where the full stop separates the year from the sequence number.
Range Delimiter field
An example of an accession number with a range is 2023/123/a-d. It has the format YYYY/Sequence /Sub Sequence Range. A range delimiter (a hyphen) separates the first value in a range from the last value. Four items (a-d) are covered by this one accession number.
You may have existing accession numbers that use the same character for delimiting segments and for expressing a range. For example, in the accession number 2023-100-a-d, the first two dashes are segment delimiters and the last dash is a range delimiter. In such cases we can give you a "Pre-Parser" to rationalise this number so that the system can still perform accession number validation.
Alphanumeric segments
Very occasionally, accession number formats include a segment that uses both alpha and numeric characters. For example, an archive format may have the following structure: Series / Box / File number. An accession number with this format might be 00001/123/AB67. The file number (AB67) contains both alpha and numeric characters. In this case, you would tick the Use Segment Delimiter for Alphanumeric Segments checkbox.
The Alphanumeric check box is often used in conjunction with a Pre-Parse routine. If there is more than one occurrence of alpha and numeric characters with no segment delimiter inserted between them in any accession number format, there is a conflict which will affect accession number validation. Contact us for assistance. We can create a Pre-Parse program for you. This will apply extra logic to numbers using the format, and allow accession number validation.
Step 4: Enter the dates and departments
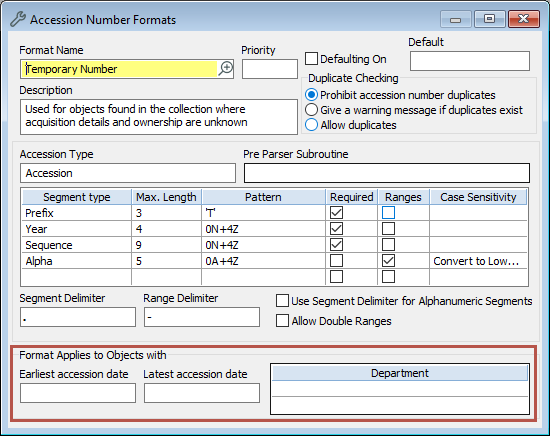
You can define the earliest and latest accession dates for which a format is applicable. This is particularly useful when multiple formats may give rise to identical accession numbers. In our example for the Temporary Number format, any date or department is valid, so these fields are left blank.
-
If your format applies to objects accessioned within a certain period, enter the dates in Earliest accession date and Latest accession date. For example:
-
If a format will only be applied to new acquisitions, you can enter today's date as the earliest accession date.
-
If a format has only been used since 1971, you can enter 1 January 1971 as the earliest accession date.
-
If a format was only used until the end of 1985, you can enter 31 December 1971 as the latest accession date.
-
-
If your format applies to objects from a particular department, enter the department in the Department field. You can enter multiple departments. If a department has sub-departments, make sure you enter those, otherwise only the main department will be used for validation.
Earliest and latest accession dates
When creating an Object record, be sure to enter the accession date in the Accession Date field before entering the accession number.
Date validation on accession number formats is optional when creating Object records. If you have specified a date range for which this format is valid, you can still use this format in an Object record without specifying an accession date for that record.
Department
When creating a new Object record with an accession number that could fit more than one named format, be sure to enter the Department(s) before entering the accession number if you have specified a Department for the format.
The Department on the Object record must match the Department of the accession number format. If a user attempts to enter an accession number with this format without first having entered the correct department, the system will not allow the entry of this accession number.
Step 5: Set the defaulting
You can save time during data entry of new accession numbers by turning on the defaulting feature and entering a default number. The system will provide the next sequential accession number as a default in the Accession Number field in a new Object record.
If your system has multiple accession number formats, then the last format used in a data entry session by any user determines the next sequential accession number offered. The most recently used format (that has defaulting turned on) in a particular user's current session determines the default accession number offered to that user.
Then, whenever an accession number is saved, the format to which it belongs is saved with it, and becomes the current top format in the list. This is taken to be the default format for this user.
-
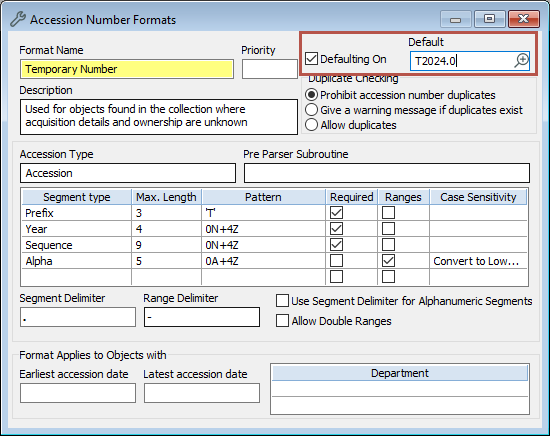
If you would like defaulting turned on, tick Defaulting On.
-
If you would like an accession number as the default, enter it in the Default field. Enter the number before the first number you would like to be available. In our example for the Temporary Number format, we want the first number available for use to be T2024.1. So we would enter T2024.0 in this field.
Notes
-
Until you have actually used a number, the system does not know where to start from. So you must for the first time type the number in the Accession Number field, and thereafter it should allow the defaulting.
-
Users can turn off defaulting by going to the Tools menu > User Tools > User Preferences. On the Settings tab, they can clear the Enable Accession Number Defaulting checkbox. If defaulting is not working for a user, ask them to check this setting.
-
Users can set their own accession number defaults. For more information, see Set your own default accession number format.
Step 6: Set the duplicate checking
Accession numbers are usually unique. That is, an accession number belongs to one accessioned 'item'. However, in some special cases, two or more unrelated items can have the same accession number.
For example, the institution may control collections from separate sources that have had accession numbers applied, and these numbers are retained by the institution. Items in these collections have accession numbers that also belong to items in another collection within the institution.
The system allows you to distinguish between accession number formats that are duplicated elsewhere, and formats which are unique and for which duplicate accession numbers should be disallowed.
You may wish to exceptionally allow duplicate accession numbers in a format for a specific time period or section of data entry. You can switch duplicate checking off for the data entry, and then on again upon completion.
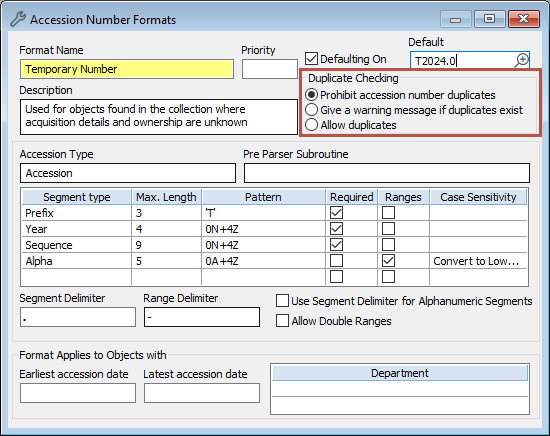
Under Duplicate Checking, select your preferred option:
-
Prohibit accession number duplicates: This is the default recommended option. The system will not allow you to save the record if the accession number using this format already exists for another record.
-
Give a warning message if duplicates exist: A warning message will be displayed if the same accession number within this format is entered for more than one record.
-
Allow duplicates: The system will allow more than one record to have the same accession number.
Step 7: Set the priority
If your organisation uses more than one accession number format, there may be accession numbers which fit more than one of the formats.
For example, there may be a format with the pattern YY.Sequence, and another with the pattern sequence.YY, and an object with the accession number 68.69. It can be difficult for the system to know which of these two formats the accession number belongs to. Validation can only work properly if the system checks the accession number against the correct format.
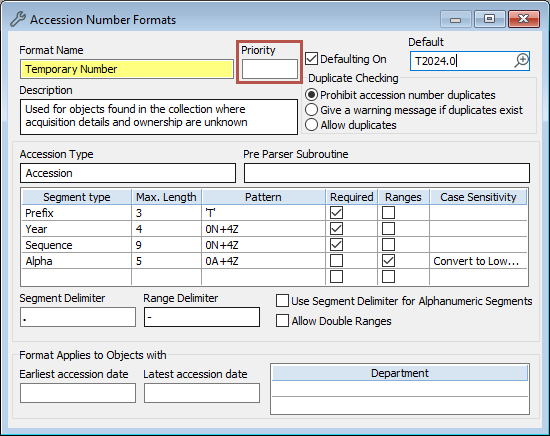
The first option is to constrain an accession number format to a department or a date range as described in Step 4. If that's not possible, then you can use the Priority field to specify the order in which the formats should be applied to run validation on the accession number. If the accession number fits more than one format, it will be compared (for validation) with the format with the highest priority.
The lower the number entered in this field, the higher the priority of the format. For example, if you enter 010 for the format with the highest priority, the next most used format could be given 020 and so on. Leaving a gap between the priority numbers allows you to prioritise new accession number formats later, without having to re-configure priorities for the existing formats.
Step 8: Save the format
Click Save.