Change your image file paths
If you reorganise and move your image folders, you can use the Text Find and Replace tool to change the file paths of your images in Vernon CMS.
Tip: If your image directory has changed or moved to a different location, see Change your external file directories. The image directory is the top-level or "parent" folder containing all your image sub-folders.
Remove a folder name from your image file paths
-
Go to the Tools menu and click Text Find and Replace.
-
Under File, select Photo/Audio-Visual.
-
In the list of Available Fields, double-click Digital Filename to put it in the list of Fields to Search.
-
In the Find field, enter the folder and a back slash. For example, if the folder you want to remove is called Fumpston, then enter Fumpston\ in the field.
-
Leave the Replace field empty.

-
Select the records with List Manager or Advanced Search.
-
To select all records:
-
Click the List Man. button.
-
In List Manager, go to the Records menu and click All Records.
-
Once the records are loaded, click OK.
-
-
To find specific records:
-
Click the Search button.
-
In Advanced Search, in the list of Search Fields, select Digital Filename and click Next.
-
In Search For, enter the folder name followed by a back slash. For example, enter Fumpston\ and press Enter.
-
Click Next and then Finish.
-
-
-
Click Update.
Insert a folder name in your image file paths
-
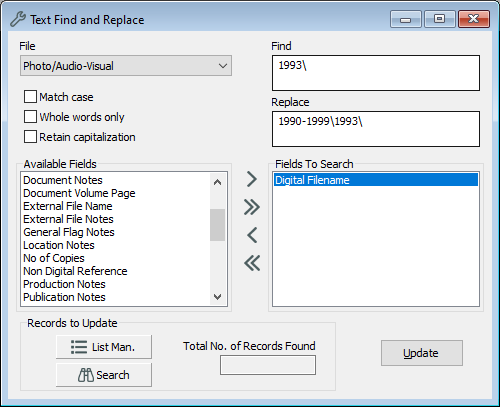
Go to the Tools menu and click Text Find and Replace.
-
Under File, select Photo/Audio-Visual.
-
In the list of Available Fields, double-click Digital Filename to put it in the list of Fields to Search.
-
In the Find field, enter the folder that will be inside the new folder, and a backslash. For example, if you have added a folder in your image directory called 1990-1999 and put the 1993 folder inside it, enter 1993\ in this field.
-
In the Replace field, enter the new folder name and a back slash followed by the current folder and a backslash. In this example, you would enter 1990-1999\1993\ in the field.
-
Select the records with List Manager or Advanced Search.
-
To select all records:
-
Click the List Man. button.
-
In List Manager, go to the Records menu and click All Records.
-
Once the records are loaded, click OK.
-
-
To find specific records:
-
Click the Search button.
-
In Advanced Search, in the list of Search Fields, select Digital Filename and click Next.
-
In Search For, enter the folder name followed by a back slash. For example, enter 1993\ and press Enter.
-
Click Next and then Finish.
-
-
-
Click Update.